Exploring the MangoPi - A Journey into RISC-V Assembly.
John L. Carveth
Introduction
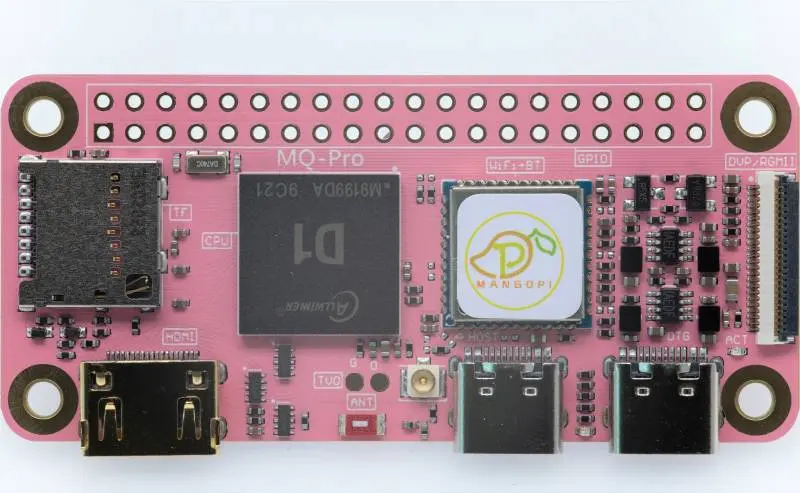
I have held an interest in Single-Board Computers (SBCs) for a while now, and my journey eventually led me to the MangoPi. In this blog post, I'll take you through my exploration of this intriguing single-board computer, powered by the AllWinner D1 SoC with its revolutionary RISC-V-based core. Join me as I delve into the process of installing Linux on the MangoPi, connecting via SSH, and venturing into the realm of RISC-V assembly programming.
Installing Linux on the MangoPi
Choosing the right operating system is crucial, and for my MangoPi adventure, I opted for the Ubuntu RISC-V build. Although there wasn't an official Ubuntu image tailored for MangoPi, I discovered that the AllWinner Nezha board shares the same SoC. Armed with this insight, I confidently downloaded the Ubuntu image from here, targeting the Nezha board.
After encountering challenges with the provided Armbian images and deeming the Tina Linux installation a bit complex, the Ubuntu RISC-V build emerged as a practical choice. To write the image onto the SD card, I initially attempted using the dd command but faced boot issues. Eventually, I found success using rpi-imager after realizing it needed to run as root to avoid writing failures.
Booting into Linux
Once the SD card was written, it was time to try to boot into Linux. First thing I needed was a power supply. I had searched through the documentation extensively but could not find the voltage/amperage required for the board, so I checked the specifications of the power supply I used with my Raspberry Pi B+, and used a power supply with a similar output. I ended up using a 3.0A 5V USB C power supply that came with an old Google Pixel.
With the SD card inserted and power connected, a small green LED lit up on the board. I also used a USB->Ethernet dongle so that the MangoPi could connect to the internet.
Once I had shell access to my MangoPi, it was time to begin writing my first RISC-V assembly program.
Hello, RISC-V!
Of course the first program I had to write in RISC-V assembly was Hello World. Let's begin with the source code, followed by a line-by-line explanation.
.global _start 		# Provide program starting address to linker

# Setup parameters to print helo world
# and then call Linux to do it

_start: addi 	a0, x0, 1 	# 1 = StdOut
    la 	a1, helloworld 	# Load address of helloworld
    addi 	a2, x0, 13 	# length of our string
    addi 	a7, x0, 64 	# Linux write system call
    ecall 			# Call linux to terminate the program

# Setup parameters to exit the program

    addi 	a0, x0, 0 	# Use 0 return code
    addi 	a7, x0, 93 	# Service command code 93 terminates
    ecall 			# Call Linux to terminate the program

.data
helloworld: 	.ascii "Hello World!\n"
The first line includes a directive, .global, which is used to export the symbol _start to the global symbol table. _start is the default label used by the linker ld as the program entry point.
We then add immediate value 1 to the value stored in register x0 (which is always 0). The result of this arithmetic is stored in register a0. The 1 is a file descriptor representing standard output (STDOUT).
Then we use the load address instruction to load the address of label helloworld into register a1. Later on in the code, we use the .ascii directive to store a string at this address in memory.
The following line is quite similar to the first instruction, an immediate value of 13 is stored in register a2, representing the number of characters that will be printed to STDOUT. Newline "\n" is treated as a single character.
Finally, the value 64 is loaded to register a7. 64 corresponds to the write system call, and a7 is the register used for making system calls. The ecall directive on the next line instructs the operating system to execute the system call.
Once the system call has been made, our program needs to send out a return code. 93 corresponds to the exit system call.
The data section is used to declare our static values.
Compiling The Binary
I wrote the following make file to facilitate compilation of the binary:
# Set the RISC-V GNU Toolchain binaries path
TOOLCHAIN_PATH := /opt/homebrew/bin

# Set the RISC-V GNU toolchain binaries prefix
TOOLCHAIN_PREFIX := riscv64-unknown-elf-

# Set the assebmler and linker
AS := $(TOOLCHAIN_PATH)/$(TOOLCHAIN_PREFIX)as
LD := $(TOOLCHAIN_PATH)/$(TOOLCHAIN_PREFIX)ld

# Set the source and object files
SRC := hello.S
OBJ := hello.o

# Binary file name
BIN := hello

all: $(BIN)

$(BIN): $(OBJ)
    $(LD) -o $@ $<

# Rule to build the object file
$(OBJ): $(SRC)
    $(AS) -o $@ $<

clean:
    rm -f $(OBJ) $(BIN)
Running make will generate a binary file which can then be copied to the MangoPi.
Conclusion
In summary, my journey with the MangoPi and RISC-V assembly has been a hands-on exploration filled with challenges and discoveries. As I wrap up this chapter, it's clear there's much more to uncover and experiment with in the world of RISC-V. The MangoPi stands as an open invitation for further tinkering and exploration, offering exciting possibilities for those eager to dive into the heart of this single-board computer and the simplicity of RISC-V assembly. Stay tuned for more practical insights and experiments in this ongoing tech adventure!